The Math Behind Perfect Floor Plan Examples (Simplified)
Planning an event can feel like juggling a million details at once. From guest lists to catering, the to-do list seems endless. But one crucial element often gets overlooked: the floor plan. A well-designed floor plan isn't just about aesthetics; it's about functionality, flow, and ensuring your guests have a comfortable and enjoyable experience. Think of it as the unsung hero that quietly orchestrates a successful event. Ready to unlock the secrets to creating flawless floor plan examples? Let's dive in!
Key Takeaways
- Understanding space requirements is the foundation of any successful floor plan.
- Clearly define the purpose of each area within your event space.
- Utilize free online tools like EventFloorPlanner.com to easily create and visualize your floor plan.
Why Floor Plan Examples Matter
Have you ever attended an event where the tables were crammed together, making it impossible to move around? Or perhaps the dance floor was awkwardly placed in a corner, far from the bar and seating? These are examples of poor floor planning, and they can significantly impact your guests' enjoyment. Floor plan examples provide a visual representation of how your event space will be utilized, allowing you to anticipate potential problems and optimize the layout for maximum comfort and flow. They’re not just pretty pictures; they’re strategic blueprints for success.
Think of a floor plan as the roadmap for your event. It dictates how people will move through the space, where they'll congregate, and how they'll interact with each other and the various elements of your event. A well-thought-out floor plan ensures a smooth, seamless experience, while a poorly planned one can lead to bottlenecks, confusion, and discomfort.
Plus, reviewing floor plan examples can spark creativity and help you discover innovative layouts you might not have considered otherwise. They provide a starting point, allowing you to adapt and customize designs to perfectly suit your specific event needs and vision.
Understanding Space Requirements
Before you even start sketching out your floor plan, you need to understand how much space you actually have to work with. This involves more than just knowing the square footage of your venue; it requires considering the shape of the room, the location of doors and windows, and any fixed elements like pillars or built-in bars. Knowing these constraints will help you make informed decisions about furniture placement and traffic flow.
A crucial aspect of this is understanding the space requirements for different elements of your event. How much space does each table need? How big should the dance floor be to comfortably accommodate your guests? What's the minimum aisle width required for people to move freely?
Here's a quick guide:
- Round tables (60-inch): Allow 10-12 square feet per person.
- Rectangular tables (6-foot): Allow 8-10 square feet per person.
- Dance floor: Allocate 4-5 square feet per dancer.
- Aisles: Aim for a minimum width of 3-4 feet.
Don't forget to factor in space for buffet tables, bars, entertainment areas, and any other special features of your event. Accurate measurements are key to preventing overcrowding and ensuring a comfortable experience for your guests. Use Venue Capacity Calculator to estimate the space you need.
Defining Zones and Functions
Every successful event floor plan clearly defines different zones and their corresponding functions. Consider what activities will be taking place and how these activities should be separated or integrated. For example, you might have a dining area, a dance floor, a lounge area, a bar, and a registration area. Each of these zones needs to be carefully planned to ensure optimal flow and functionality.
Think about the relationship between these zones. Should the bar be close to the dance floor? Should the dining area be separated from the louder entertainment area? Consider the noise levels and the desired ambiance of each zone when making these decisions.
Clearly defining these zones in your floor plan examples will help you visualize how the space will be used and ensure that everything is logically arranged. It also helps your vendors understand your vision and set up their equipment accordingly.
Creating Your Floor Plan (Step-by-Step)
Ready to bring your floor plan to life? Here's a step-by-step guide to help you create a professional-looking floor plan:
Before You Start
- Gather accurate measurements of your venue.
- Determine the number of guests you'll be accommodating.
- Identify the key zones and functions of your event.
Choose a Floor Plan Tool
There are many floor plan tools available, but for a free and easy-to-use option, check out EventFloorPlanner.com. Its drag-and-drop interface makes it simple to create and customize your floor plan without any prior experience. No signup is required, so you can start planning immediately! Other options include paid software like AutoCAD or SketchUp for more advanced features.
Input Venue Dimensions
Start by entering the dimensions of your venue into the floor plan tool. Be as accurate as possible to ensure your plan is to scale. Don't forget to include the location of doors, windows, and any fixed elements.
Add Key Elements
Begin adding the key elements of your event, such as tables, chairs, dance floor, bar, and buffet tables. Use the space requirements you calculated earlier to determine the appropriate size and placement of each element.
Arrange and Adjust
Experiment with different arrangements until you find a layout that maximizes space and flow. Consider the sightlines from different areas of the room and make sure there are clear pathways for guests to move around.
Review and Refine
Once you're happy with the basic layout, review it carefully to identify any potential problems. Are there any bottlenecks? Are there any areas that feel cramped or awkward? Make adjustments as needed until you're confident that your floor plan is both functional and aesthetically pleasing.
Leveraging Floor Plan Templates
Not sure where to start? Consider using floor plan templates as a starting point. EventFloorPlanner.com offers a variety of free templates for different types of events, from weddings to corporate conferences. These templates can save you time and effort by providing a pre-designed layout that you can customize to fit your specific needs.
Using a template can be particularly helpful if you're working with a common venue layout. Simply choose a template that closely resembles your venue and then adjust the dimensions and elements to match your specific requirements. This can be a much faster and easier process than starting from scratch.
Even if you don't find a template that perfectly matches your needs, you can still use them as inspiration. Browse through different templates to see how other people have arranged their events and get ideas for your own layout. Remember, the key is to adapt and customize the template to make it your own.
Lighting and Ambiance Considerations
Your floor plan isn't just about furniture placement; it's also about how you'll use lighting and ambiance to create the desired atmosphere. Consider how the lighting will affect the mood of each zone. For example, you might want soft, romantic lighting in the dining area and more vibrant, energetic lighting on the dance floor.
Think about the placement of lighting fixtures in relation to your furniture. Avoid placing lights directly above tables, as this can create harsh shadows and be unflattering to your guests. Instead, opt for indirect lighting or strategically placed lamps to create a more inviting atmosphere.
Also, consider how natural light will affect your floor plan. If your venue has large windows, you might want to position certain areas to take advantage of the natural light during the day. However, be mindful of glare and heat, and consider using window coverings to control the amount of light entering the space.
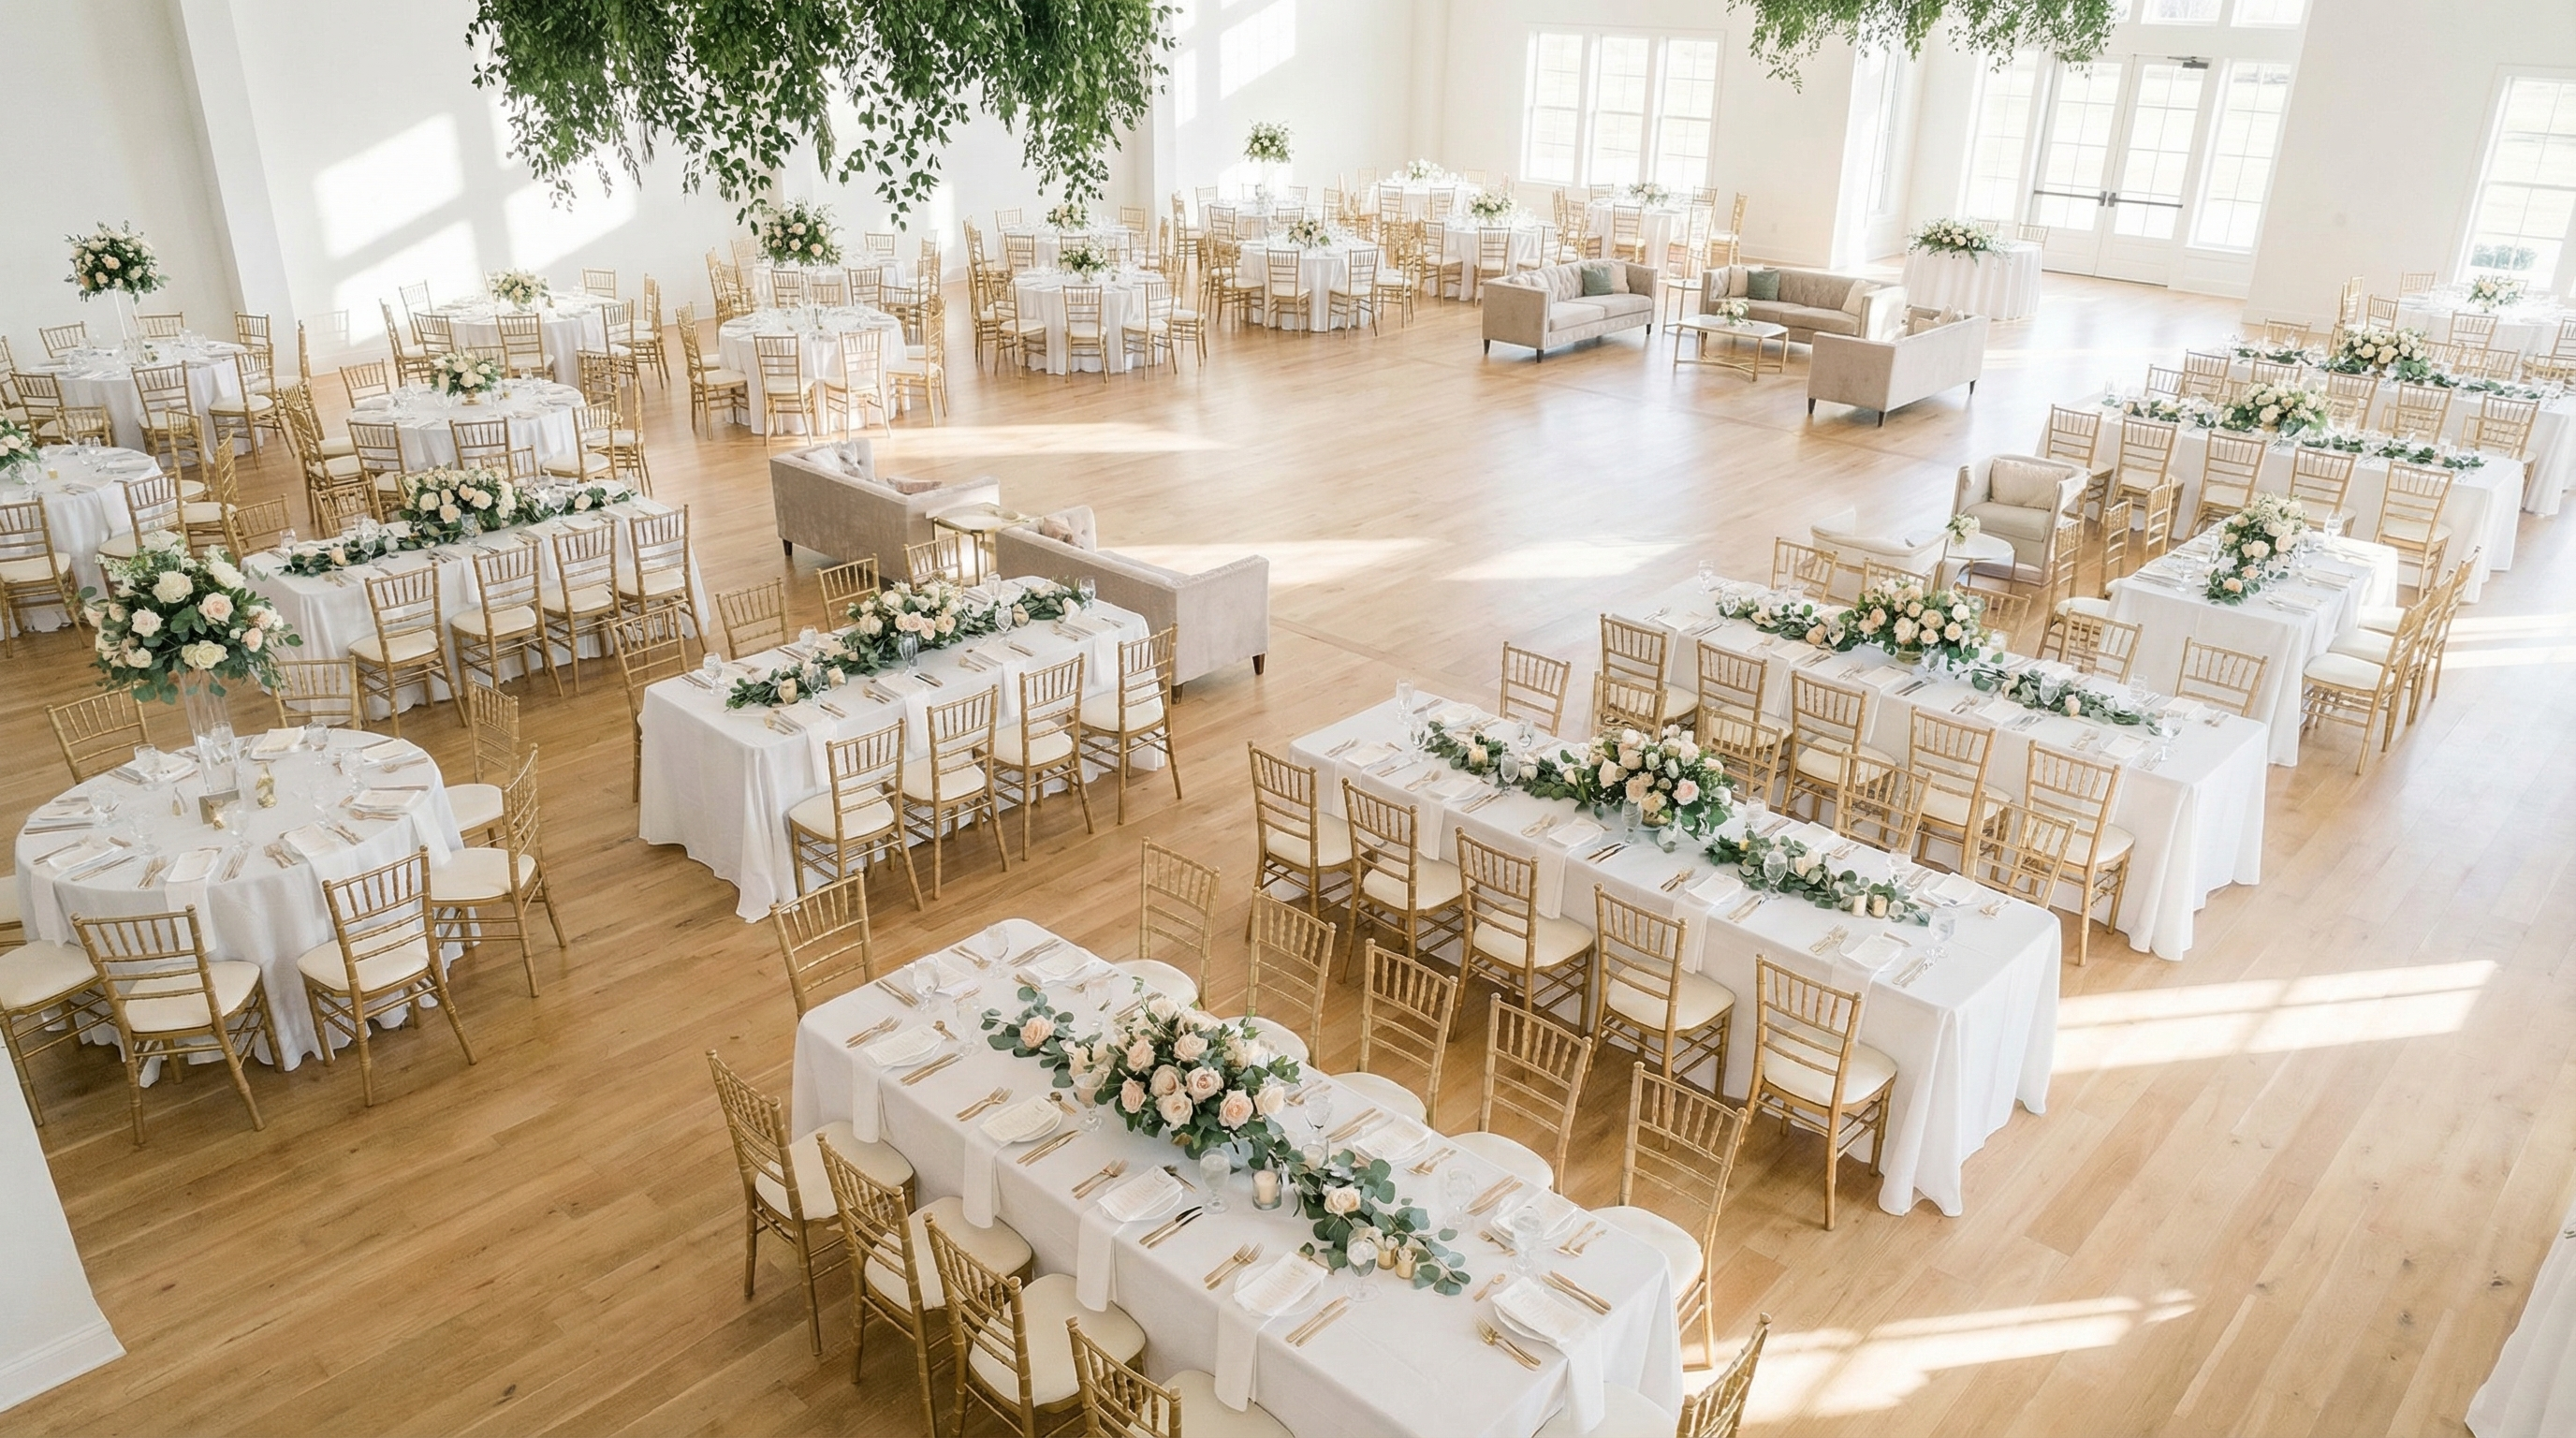
Floor Plan Examples for Different Events
Let's look at some floor plan examples tailored for specific events:
- Wedding Reception: Focus on creating a romantic and elegant atmosphere. Consider a central dance floor surrounded by tables, with a separate lounge area for guests to relax.
- Corporate Conference: Prioritize functionality and networking. Arrange tables in a classroom or theater style for presentations, and create breakout rooms for smaller group discussions.
- Birthday Party: Design a fun and festive layout with plenty of space for dancing and socializing. Consider a dedicated area for food and drinks, and a separate area for games or activities.
Remember to adapt these floor plan examples to your specific needs and preferences. Consider the size of your venue, the number of guests, and the overall theme of your event when making your decisions.
Common Floor Plan Mistakes to Avoid
Even with careful planning, it's easy to make mistakes when creating your floor plan. Here are some common pitfalls to avoid:
- Ignoring Traffic Flow: Make sure there are clear pathways for guests to move around without bumping into furniture or each other.
- Poor Table Placement: Avoid placing tables too close together or too far apart. Aim for a comfortable distance that allows for conversation but doesn't feel isolating.
- Neglecting Accessibility: Ensure that your floor plan is accessible to all guests, including those with disabilities. Provide ramps, wide aisles, and accessible restrooms.
- Forgetting the Dance Floor: If you're planning on having dancing, make sure the dance floor is large enough and located in a central area.
Expert Tips for Flawless Floor Plans
Want to take your floor plan to the next level? Here are some expert tips to help you create a truly memorable event:
- Visualize in 3D: Use a floor plan tool that allows you to visualize your layout in 3D. This will give you a better sense of how the space will actually look and feel.
- Consider Sightlines: Think about the sightlines from different areas of the room. Make sure that guests have a clear view of the stage, dance floor, or any other focal points.
- Prioritize Comfort: Comfort is key to a successful event. Provide comfortable seating, adequate ventilation, and a temperature that is comfortable for everyone.
- Get Feedback: Share your floor plan with friends, family, or colleagues and get their feedback. A fresh perspective can help you identify potential problems or areas for improvement.
Remember, a successful floor plan example is more than just a drawing; it's a strategic blueprint for creating a memorable and enjoyable event for your guests. Take the time to plan carefully, and you'll be rewarded with a smooth, seamless, and successful event.
By following these tips and using tools like EventFloorPlanner.com, you can create floor plan examples that will impress your guests and ensure a successful event. Don't be afraid to experiment and get creative – the possibilities are endless!
Frequently Asked Questions
Written by
Event Floor Planner Team
Helping event planners create stunning floor plans and seating charts for weddings, corporate events, and special celebrations.
Stay in the Loop
Get expert event planning tips, layout ideas, and exclusive guides delivered weekly.
No spam. Unsubscribe anytime.
Related Articles
Real Historic Venue Layout Considerations Layouts From Real Events
Why Historic Venues Are A Double-Edged Sword For Event Planners You just booked a stunning 19th-century ballroom. High ceilings. Crystal chandeliers. Original marble floors. But now you're star...
Poker Tournament Table Layout for Events: a Practical Guide for 2026
Why Your Poker Tournament Table Layout Can Make or Break Your Event Picture this: You are hosting a poker night. The chips are stacked. The decks are shuffled. But your guests can't move. They bum...
Everything You Need to Know About Bridal Shower Setup
Bridal Shower Setup: Your Complete Guide to a Flawless Celebration Planning a bridal shower can feel overwhelming. Where do you even start? You want it to be special for the bride-to-be, but you a...